Tag Archives: Dynamics365

Embedding a rich text controller to a field using a Canvas App

If you have been working with Dynamics 365 CE, you may have come across requirements that needed a rich text controller for a field. Here’s a quick and easy way of embedding a Canvas App with a Rich Text controller to a Dynamics 365 field.

(The new PowerApps Component Framework and CLI will further extend the capability to build a controller that we could directly bind to the field within the model driven app. I’m currently working on this and please follow this space for updates.)

For this demo I will be using the description field of the out of the box Account entity. Here are the steps:

1.   Add the canvas app controller to the field to embed a canvas app. To do this:

Select the “Description” field on the form editor and click “Change Properties” to open the “Field Properties” window

rtfcanvas1

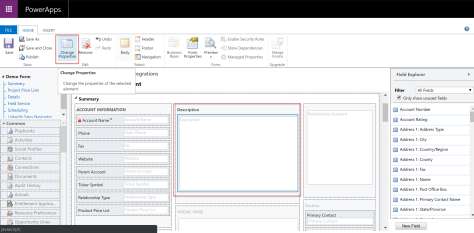
Select the “Controls” tab and click “Add Control”

rtfcanvas2

Select “Canvas App” and add the Canvas App controller to the field. Also make sure you enable the canvas app controller for the web accessibility

rtfcanvas3

rtfcanvas4.1

2.   Once this is done, it’s time to create the Canvas App. We can simply click on the “Customize” button to launch the PowerApps designer. For more information on embedding Canvas Apps please visit Microsoft documentation here.

rtfcanvas4

3.   At this stage we can hide the gallery object that has been added to the Canvas App by default as we would not be interacting with it in the UI. To do this you can set the “visible” property of the gallery to “false”.

Also note that the context of the account is passed to the Canvas App as a custom data set “ModelDrivenDataIntegration” which is set as the data set for the gallery.

rtfcanvas5

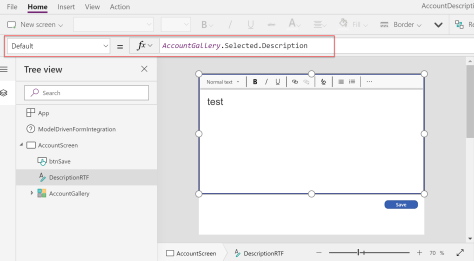
4.   Now it’s time to add the Rich text editor to the form. Rich text editor is available under the text controllers within the “Insert” tab.

rtfcanvas6

5.   Then set the default value of the editor to the description field. This will map the existing value of the description field to the editor on load of the form.

rtfcanvas7

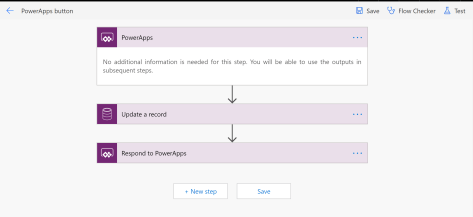
6.   After the value has been mapped, let’s move on to the save event. I have added a Save button to trigger this event for demo purposes. There will be 3 functions fired as a result of this.

  • Invoke a Microsoft Flow Action to update the account record with the new Description value.
  • Save the Model Driven App form in Dynamics 365 (ModelDrivenFormIntegration.SaveForm)
  • Refresh the Model Driven App form in Dynamics 365 (ModelDrivenFormIntegration.RefreshForm)

rtfcanvas8

(The flow I have used for this task is a simple 3 step process. Canvas app will pass the account ID and the description value to the Flow and the Flow will update the Record using these parameters.)

rtfcanvas9

rtfcanvas10

7.   Now it’s time to save and publish the app. Once this is completed you can navigate back to your Dynamics 365 form designer and you will see the app ID is generated and has been assigned to the controller. Save and Publish the Dynamics 365 form and test your form and the functionality.

rtfcanvas11

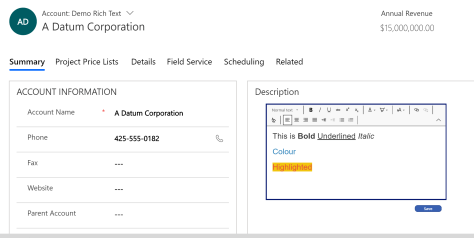
The value of the rich text is stored as html in the field. I have also tried mapping the content of this field to e-mail templates and it works well too.

Extending Conditional Operators in Flow

If you have worked with Flow conditions, you would have noticed that the Flow designer filters the list of operators you can use based on the data type of the field. However this does not mean that you cannot use other operators on that particular field.

For instance if you use a Date/Time field on your condition, the designer would not give you the option to select the following operators:

  • greater than
  • greater than or equal to
  • less than
  • less than or equal to
Date field basic conditional operators
Basic conditional operators for a date field

However you can use operators that are not displayed in the basic mode. You can use the advanced mode to extend the Flow conditional operators.

Extend Conditions on Advanced Editor
Extend conditions on advanced editor

If you save and re-open the Flow, the extended operator is now displayed in the basic mode as well.

Extended conditions when re-opening

Here are the possible operators you can use in Flow:

contains: contains(attributename,value)

does not contain: not(contains(attributename,value))

equals: equals(attributename,value)

does not equal: not(equals(attributename,value))

starts with: startsWith(attributename,value)

does not start with: not(startsWith(attributename,value))

ends with: endswith(attributename,value)

does not end with: not(endswith(attributename,value))

greater than: greater(attributename,value)

greater than or equal: greaterOrEquals(attributename,value)

less than: less(attributename,value)

less than or equal: lessOrEquals(attributename,value)


Bonus Content:

Most of you who have worked with Flow would have come across situations where you had to use multiple or complex conditions in your flow implementations. One of the most time consuming aspects I found was implementing grouped conditions. One way to achieve this is to have multiple nested condition blocks. However this can get really messy if you have lots of conditions. The recommended way to achieve this would be to build your filter criteria in advanced mode and combine all conditions into one Flow condition step/block. I have noticed some users having difficulties building filter criteria in the advanced mode due to various reasons.

To simplify this process I decided to build a XrmToolBox plugin that can convert FetchXML filters to Flow conditions. The idea is to help the users by allowing them to build the conditions in D365 advanced find UI and export the FetchXML to the plugin and generate the equivalent Flow condition. This is currently in test mode and has the ability to convert some of the basic FetchXML conditional operators to Flow. I will publish this soon for everyone to use. But if anyone would like to help me test and give feedback prior to the release please feel free to contact me.

XRM toolkit plugin
Sneak peek of FetchXML to Flow condition converter plugin for XrmToolBox

P.S. Azure LogicApps (big brother of Flow) currently supports building grouped conditions using the designer (without having to use an advanced mode). Lets hope this is on the road map for Flow too.

Microsoft Flow basics and limitations when working with Dynamics 365

In this post I will be covering some Microsoft Flow basics and limitations when working with Dynamics 365. This will help you determine which Flow plan and/or connectors suites best for your needs.

Connecting to your Dynamics 365 instance

Firstly let’s look at the connectors for Dynamics 365. You have two options when it comes to connecting to a D365 instance.

  1. Dynamics 365 connector

D365Connector

The Dynamics 365 connector provides limited access to the Dynamics 365 organisation.

For more info on trigger events and actions please visit: https://docs.microsoft.com/en-us/connectors/dynamicscrmonline/

  1. Common Data Services (CDS) connector

CDSConnector

Provides access to the org-based database on the Microsoft Common Data Service.

For more info on trigger events and actions please visit: https://docs.microsoft.com/en-us/connectors/runtimeservice/

Now let’s do a side by side comparison between some of the notable features:

Feature Dynamics 365 Connector CDS Connector
Trigger Flow on create Available Available
Trigger Flow on updates Available Available
Trigger Flow on specific attribute updates Not available

Limited to record level updates only

* Which means you will have to take extra measures if you have to update the triggering record within the same flow. This is to stop the flow from triggering infinitely.

Available
Change Tracking limitations Requires Change Tracking to be enabled in D365 Change Tracking is not required
Define level of scope for the Flow trigger Not available

Limited to Organisation level only

Available

  • Organisation level
  • Parent: Child Business Unit level
  • Business Unit level
  • User level
Trigger Flow on deletes Available Available
Manually trigger when a flow is selected Not available Available
Action: Create Note (annotation) for specified entity record Manual Special simplified action is available
Action: Retrieve all Notes (annotations) for the provided entity Id Manual Special simplified action is available
Action: Retrieves file content for specified Note (annotation) Manual Special simplified action is available
Connector Type Standard Premium

(Only available in Flow Plan 1 and 2)

Triggers

Let’s have a look at the trigger event screens of each connector. I have selected the “When a record is updated” trigger event for the screenshots.

Dynamics 365 connector:

D365Trigger

CDS Connector:

CDSTrigger

CDS connector will give you the option to select the Scope for event triggers. Scope can be set to Organisation, Parent: Child Business unit, Business Unit or User level. This is similar to the native workflow engine in D365.

In addition to the scope you will also have the option to select attribute filters. Attribute filters will ensure the event trigger is only invoked when the specified attributes are updated.

Points to consider when using update triggers:

  • Update event triggers are invoked on Update requests to the record. Event triggers would NOT check whether any attribute values are being changed or not. As long as the update request is successful the Flow would be triggered.

What does this mean?

For update triggers at record level, the flow would still be invoked even if the update request has not made any field value changes to the record (Applies to D365 connector and CDS connector both)

For update triggers with attribute filters, the flow would be invoked even if the update request is setting the attribute to its existing value (Applies to CDS Connector)

Flow Plans

Now that we have covered triggers and actions let’s have a look at Flow Plans. Currently Flow offers 3 plans.

Flow Free Flow Plan 1 Flow Plan 2
  • 750 runs per month
  • Unlimited flow creation
  • 15-minute checks
  • 4,500 runs per month
  • Unlimited flow creation
  • 3-minute checks
  • Premium Connectors
  • 15,000 runs per month
  • Unlimited flow creation
  • 1-minute checks
  • Premium Connectors
  • Org policy settings
  • Business process flows

You can check out Microsoft Flow Plans page for more information.

Limits and configuration in Microsoft Flow

Documentation from Microsoft provides more information on current request limits, run duration and retention, looping and debatching limits, definition limits, SharePoint limits or IP address configuration.

For current limits and configuration details please visit Microsoft Docs here.

There are also some limitations in the Flow designer UI compared to the native workflow designer in D365. One of them being the ability to design grouped conditional statements. Currently Flow does not provide grouped conditions to be configured in Basic mode. Which means you will have to use the advanced mode to build your conditional statements. I have noticed that LogicApps have already added the ability to group conditional statements in the basic designer and hopefully this is on the roadmap for Flow too.

Flow:

FlowCondition

LogicApps:

LogicAppsCondition

Even with these limitations Flow offers a lot more than the native D365 workflow engine.

You can checkout Microsoft Flow Documentation page for more information and how-to guides.

I would also highly recommend watching “What the Flow” vlog series by Elaiza if you wish to learn more about Flow and how to transition from native D365 workflows to Flow.

Using Computer Vision API with Dynamics 365 and Microsoft Flow

ComputerVisionAPI

In this post I will be demonstrating how to use the Computer Vision API with Dynamics 365 and Flow.

Before we go into much details lets have a quick look at what “Computer Vision” API is and what it is capable of doing.

Computer Vision API is one of the AI offerings from the Microsoft Cognitive Services. Computer Vision API uses Image-processing algorithms to smartly identify, caption and moderate your pictures.

Main features include:

  • Analyse and describe images
  • Content moderation
  • Read text in images, including handwritten text (OCR)
  • Recognize celebrities and landmarks
  • Analyze video in near real-time
  • Generate a thumbnails

In this Example, I will be demonstrating how to use the Computer Vision API with Dynamics 365 and Flow. Flow only offers limited functionality of the Computer Vision API however if you wish to use it to its full potential, you can custom build a service using Microsoft Cognitive Services. The following example can be used to read text from receipts or to auto generate tags and descriptions for images uploaded to Dynamics 365.

  1. Create a trigger for your Flow. In this example I have used the creation of a “Note” (annotation) in D365 as the trigger.
      • You will have to setup the connection to your Dynamics 365 instance and use it when setting up the trigger

    1

  2. In the next step I’m initializing a variable to capture the results of the analysis. Click the ‘+’ button below the trigger event created in step 1 to add a new action.
      • Select “Initialize variable” as your action

    2

      • Define the name, type and a default value for your variable

    3

  3. A note record in Dynamics 365 may or may not have an attachment associated with it. Let’s add a condition to check this.
      • Add a condition step to your flow
      • Check whether the “Is Document” property is equal to true

    4

  4. Since we are going to analyze an image we would need to check whether the attachment is an image
      • Use the mime type of the attachment to validate whether it is an image or not
      • In Flow you cannot have multiple conditions in one condition block using the basic mode
      • If you want to add multiple conditions using the basic mode, you will have to nest condition blocks
      • But in this example I have used the advanced mode and combined the two conditions into one condition block
      • You can use “@and()” or “@or()” to group your conditions

    5

  5. Next step is to create the connection to the Computer Vision API
      • For this you will need a cognitive service setup in Azure and the service URL with a key to use it
      • Add an action of type “Computer Vision API – Describe Image” in the TRUE/YES branch of the above condition

    6

      • Set the “Image Source” as Image Content
      • Set the Image content as Document body. But you will have to convert from Base64 to Binary before you pass it to the action. You can navigate to the expressions area and set this. (base64ToBinary(triggerBody()?[‘documentbody’]) )

    7

  6. Now to get the results of the analysis and capture it. I’m using the captions describing the image for the example.
      • Add a new action of type “Variables – Appends to string variable”
      • Select the variable initialized at the start of the flow
      • Append “Caption Text” and “Caption Confidence Score” to your variable
      • Since there can be multiple captions generated flow will automatically add a recursive block around your action.
      • Caption will describe the image and the caption confidence score will give you a score between 0 and 1 (where 1 being the best possible score).

    8

  7. Computer vision also analyses the image and provides tags that best suites the image. To capture this information I have added another action and append the values to the same variable as above.9
  8. Similarly we can use the Optical Character Recognition capabilities of the Computer Vision API to extract the text in the image.
      • In this example I have added another action to connect to the “Computer Vision API” of type “Optical Character Recognition (OCR) to Text”

    10

      • Similar to the previous action we will set the image source as the image content and set the image content to the document body (base64ToBinary(triggerBody()?[‘documentbody’]))
      • Then append the detected text to the variable

    11

  9. Final step is to update the note with the results.
      • Add an action to update a Dynamics 365 record
      • Select the CRM organization from your connections and the entity we are updating
      • Use the identifier of the note we are editing as the “Record Identifier”
      • Set the variable containing the results to the description field and append the existing description to the end. This way we don’t overwrite existing information that are already there in the description field.

    12

    • This step will update the Dynamics 365 record with the results of our analysis. This can be used for various purposes.

Lets look at some of the results:

OCR example
OCR example

Image description example

For more information and live demos please visit: Microsoft Computer Vision API

Here are two Flow demos I’ve prepared that uses Computer Vision API:

Twitter Social Insights

D365 Image Attachment Analysis

The Journey Begins

Hi, I’m Thanura Wijesiriwardena. I know my name is really hard to pronounce but you can always call me “T” or “Thunder” like my mates do at work and cricket.

Childhood:

Looking at my long last name most of you would have guessed it right. Yes, I was born and raised in Sri Lanka. I grew up in a suburb called “Attidiya”, about 15kms south of Colombo and next to Mount Lavinia which is famous for its beaches and the iconic Mount Lavinia Hotel.

First Steps:

I still remember the day, it was in 1995. I returned home after school to find my dad setting up a computer. It was an IBM 386 with a 40MHz processor, running windows 3.1 and had both 5.25 inch and 3.5 inch floppy drives. It was my first PC which I mainly used to play games.

It wasn’t until 1998 that I got a taste of the new and evolved Windows platform in “Windows 95” when we upgraded our pc to a Pentium 1.

Building Blocks:

I received my primary education at Thurstan College (Colombo) and then moved to D.S. Senanayake College (Colombo) for secondary education. This is where my passion for programming started.

My brother and I decided to enter a competition organised by a television broadcasting company. We built a simple html website using FrontPage Express. I was 11 and my brother was 14 then. We expressed ourselves in bold and bright colours and somehow got a mention during the results telecast.

I started programming when I was 13 (Inspired by my brother). I used VB 6 to build my first windows application. It was a contact management application linked to an Access DB. It had the ability to validate a person’s gender and date of birth based on their Sri Lankan National ID number.

I was introduced to Macromedia Flash and Dreamweaver the next year. My application programming went on the backburner as I spent more and more time on flash animations. Then I moved on to do some 3D animations using 3D Studio Max for a while.

I was just a young boy embarking on the world of technology trying to find my place.

En-route to the land down under:

Most of my younger years were spent playing cricket. But with studies being the priority for me, I decided to pause my cricket career and decided to focus more on Information Technology. After completing my school education, I joined Sri Lanka Institute of Information Technology in 2008. Two years of studying and a higher diploma later, I decided to move to Melbourne for further education.

I completed my Bachelor of Science (IT) at Swinburne University of Technology in 2010 and went on to complete Master of IT (Software Engineering) in 2011.

During these years I interned at Swinburne University of Technology and was also involved in various projects building websites, windows applications and integration pieces using different technologies such as .NET, Java and php.

Path to Business Application Platforms:

After my tenure at Swinburne I started working as a software developer for an IT solutions provider in Port Melbourne. Initially I was working on Sage SalesLogix CRM customisations and integrations. I started getting involved in Microsoft CRM projects (from CRM v4 onwards) and got liking to it soon after.

I learned the basics of business applications and CRM systems while working at Customer Systems International for 2 years.

I joined Hammond Street Developments (HSD) in January 2014. I’m privileged to work with some of the best in the business. The projects have been diverse and the experience gained has allowed me to grow as a person.

Stepping into the world of a Dynamics 365 consultant:

I’ve been working as a Dynamics 365 Technical Lead/Consultant for the past few years. My current technology focus includes Dynamics 365 Business Applications Platform and Azure serverless computing. I will be sharing my experiences and I hope you will follow me on my journey as the technology evolves.

Thanks for joining me!

— Thanura Wijesiriwardena