Tag Archives: Azure

Working with large CDS datasets in Power Automate Flows and Logic Apps

During the last 12 months I have been busy working on projects and lost my way a little bit on writing and sharing my experiences with the community. However on a positive note I learned a lot of new things during that period and now I’ve got some great content planned and waiting to be shared with you all.

Some of those learnings were around working with large CDS datasets in Microsoft Power Automate Flows and Azure Logic Apps. Here are some of those easy to learn tips, tricks, guidelines and limitations that will help you for sure.

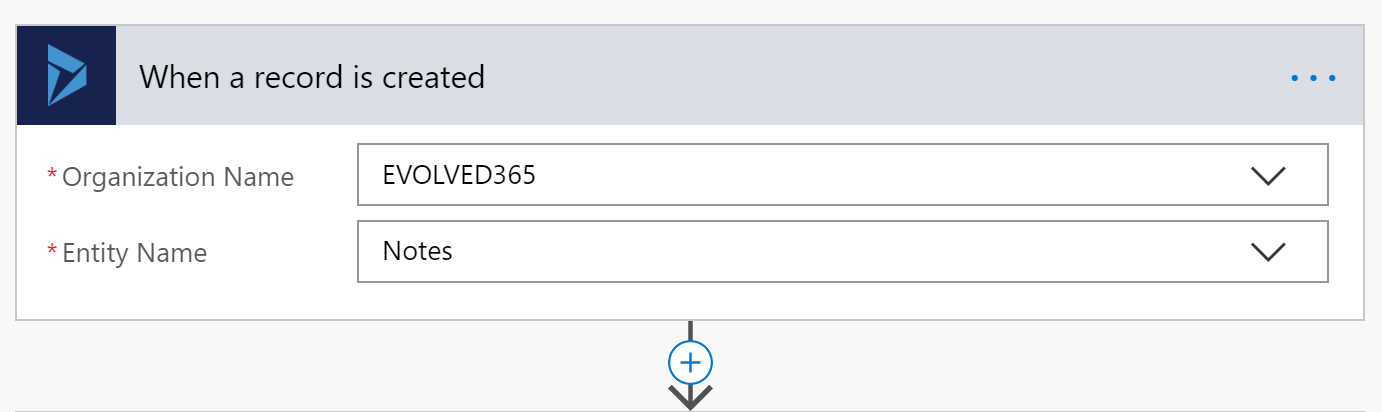
Connecting to a Common Data Service (CDS) environment

There are two main connectors you can use. “Common Data Service” connector and “Common Data Service (current environment)” connector. Let’s look at few points to consider when selecting a connector for your workflow.

Common Data Service connectorCommon Data Service (current environment) connector
Available for both Power Automate Flows and Logic Apps.CDS (current environment) is only available in Microsoft Power Automate and is not available in Microsoft Logic Apps. This is due to flows being hosted within the environment and has the ability to automatically detect the current environment. Logic Apps are hosted externally in azure resource groups and hence cannot use the CDS (current environment) connector.
Allows you to connect to different CDS environments.Always connects to the environment the flow is hosted on.
CDS vs CDS (current environment) connector usage

There are differences in triggers and actions of these connectors. I found the below posts very helpful in learning them.

CDS vs CDS: What Connector should I use in Power Automate? – Sara Lagerquist

Common Data Service (Current Environment) Cheat Sheet – Dani Kahil

I believe these connectors are there to serve different purposes. However it would be great if Microsoft standardised them and supported the same set of actions and triggers. This way there will be no difference in implementation and capability.

Querying Data

Both CDS and CDS (current environment) connectors support “List Records” action to retrieve data from a CDS environment.

  1. CDS and CDS (current environment) connectors both supports OData queries and filtering.
  2. Only CDS (current environment) supports FetchXML queries.
  3. When using OData queries there is a limit of 100,000 records as per the connector limitations. To use the maximum limit you will need to use pagination threshold property under the settings area of “List Records” action.
  4. Using FetchXML queries will limit the maximum number of records returned to 5000 records regardless of the pagination threshold set.
    • To get around this issue you can use FetchXML Builder XrmToolBox plugin to convert your FetchXML queries to OData queries.
  5. Default limits of “List Records” action
    • When using CDS (current environment) connector “List Records” action, if the “Top Count” parameter is not set the max returned record count defaults to 5000. It is important to set the “Top Count” parameter and enable pagination with a threshold if you are expecting more than 5000 records returned. (When using CDS connector the max returned record count defaults to 512.)
    • The connector action says the top count default = all but this is misleading, when tested it only returned a maximum of 5000 and 512 as mentioned above when NO top count parameter is set.
    • Top count and pagination threshold parameters have limitations when using FetchXML queries. Even if the parameter is set to a value greater than 5000 when a FetchXML query is used the maximum number of records returned will still be 5000 records.
  6. Pagination work in 512 records per page. This means the number of records returned may exceed the actual threshold (up to 511 records more).
    • i.e. if you set the pagination threshold to 60,000 you may get up to 60,416 records returned. This is because the 60,416 is equal to 118 pages of data (512 records per page).
    • To get around this you may want to set “Top Count” parameter together with the paging threshold.
  7. When using FetchXML, “Select Query” and “Expand Query” parameters are ignored as both of them can be defined in the FetchXML query it self as select attributes and linked entities.


    If you are intending to use OData queries and expand query parameters, then here is a great post by Lin Zaw Win on how to do it: [Power Automate] List Records – Use Expand Query to Retrieve Related Data in flow
  8. CDS (current environment) connector’s “List Records” action has a maximum buffer size configured. So you should try and limit the number of fields returned to reduce the byte count returned. This applies to MS Power Automate.
    Http request failed as there is an error: 'Cannot write more bytes to the buffer than the configured maximum buffer size: 104857600.'.


    “List Records” action of CDS connector in LogicApps has a larger buffer limit of ‘209715200’ (which is 2x of what is in flow)
    The action 'List_records' has an aggregated page results size of more than '211157749' bytes. This exceeded the maximum size '209715200' bytes allowed.

  9. CDS connector supports “Aggregation Transformation” (which is not available in the current environment connector). Even though the OData retrieval is possible for up to 100,000 records, aggregate functions only supports up to 50,000 records.
    • If you try to use an aggregate function on a larger data set than 50,000 you would get an “AggregateQueryRecordLimit exceeded” error.
    • You could use a filter to reduce the record count for your aggregation to get around this.


  10. Also when you define you queries always try to add an order by clause/rule, so you pick up the most important records first. (This will also help in a scenario where your job run fails and when it runs again it will pick up the records in the order given.)

Data Processing

Once the query is run and the results are returned you will have the data set ready to be processed.

  1. Looping through records can be done using:
    • “Apply to each” control in Power Automate Flows
    • “For each” control in Logic Apps
  2. Both above looping controls have concurrency controls to improve the performance of processing records.
    • However if you are using variables within your loops then you should AVOID parallel runs. This is because the same variable will be referenced within multiple parallel runs/threads at the same time and may not give you the desired output.
      Default in Power Automate flows is to run sequentially. But in Logic Apps the default is to run in parallel.


    • Both Power Automate and Logic Apps does not allow variables to be initiated within loop controls. Since variables are defined outside of the loop and then used within the loops, multiple concurrent runs will not work well with variables.
    • To force your loops to run one record at a time you need to enable concurrency controls and set the degree of parallelism to 1.
    • Please note that by using variables within your loops you are restricting the usage of parallel runs and this will impact the performance of the workflow.

Error Handling

When you process large data sets you should track and trace the result of each record processed and action it in a safe manner. If some records fail during processing, you should catch the error safely and avoid failure/cancellation of the whole job.

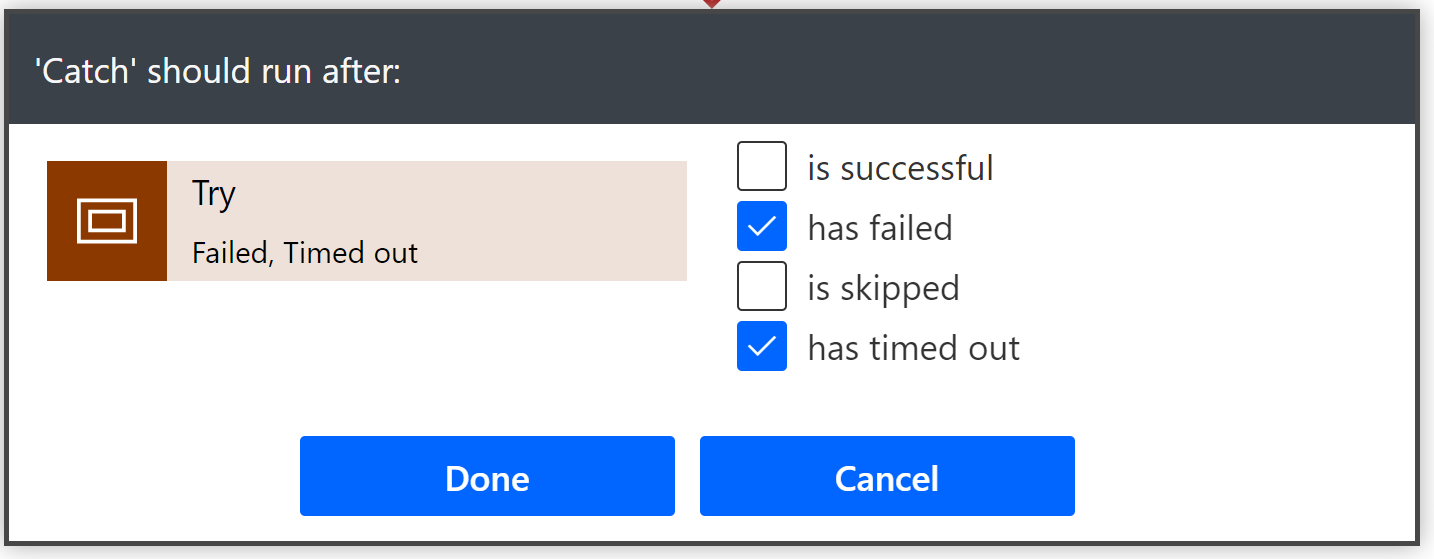
  1. Using scope controls to handle errors
    • Both Power Automate and Logic Apps support scope controls and these can be used as try and catch blocks for error handling.
    • You can use try catch blocks within your loop so you can handle errors of each record separately.
    • When configuring the catch block you need to set the catch block to only run if try block is failed or timed out.
  2. If you want to perform multiple tasks as one transactional event and rollback the changes if one of those sub tasks fails, then you should call a bound/unbound action registered in your CDS environment. If this action is registered to run synchronously then a failure within the action will revert the changes back.

Scheduling

If your Flow/Logic App is triggered based on a recurring schedule and if your workflow runs for a long time, there is a chance that the Flow/Logic App may trigger again before the current run ends. This may result in same records being processed twice. To prevent this from occurring you need to follow a singleton pattern/approach. The easiest way to do this is by setting the concurrency setting on the recurrence trigger to 1. This will ensure only one instance of the workflow is run at a given time.

It’s always a good idea to limit your data set to a manageable size and share the load over multiple runs if possible. This will reduce the risk of long running processes.

Using Computer Vision API with Dynamics 365 and Microsoft Flow

ComputerVisionAPI

In this post I will be demonstrating how to use the Computer Vision API with Dynamics 365 and Flow.

Before we go into much details lets have a quick look at what “Computer Vision” API is and what it is capable of doing.

Computer Vision API is one of the AI offerings from the Microsoft Cognitive Services. Computer Vision API uses Image-processing algorithms to smartly identify, caption and moderate your pictures.

Main features include:

  • Analyse and describe images
  • Content moderation
  • Read text in images, including handwritten text (OCR)
  • Recognize celebrities and landmarks
  • Analyze video in near real-time
  • Generate a thumbnails

In this Example, I will be demonstrating how to use the Computer Vision API with Dynamics 365 and Flow. Flow only offers limited functionality of the Computer Vision API however if you wish to use it to its full potential, you can custom build a service using Microsoft Cognitive Services. The following example can be used to read text from receipts or to auto generate tags and descriptions for images uploaded to Dynamics 365.

  1. Create a trigger for your Flow. In this example I have used the creation of a “Note” (annotation) in D365 as the trigger.
      • You will have to setup the connection to your Dynamics 365 instance and use it when setting up the trigger

    1

  2. In the next step I’m initializing a variable to capture the results of the analysis. Click the ‘+’ button below the trigger event created in step 1 to add a new action.
      • Select “Initialize variable” as your action

    2

      • Define the name, type and a default value for your variable

    3

  3. A note record in Dynamics 365 may or may not have an attachment associated with it. Let’s add a condition to check this.
      • Add a condition step to your flow
      • Check whether the “Is Document” property is equal to true

    4

  4. Since we are going to analyze an image we would need to check whether the attachment is an image
      • Use the mime type of the attachment to validate whether it is an image or not
      • In Flow you cannot have multiple conditions in one condition block using the basic mode
      • If you want to add multiple conditions using the basic mode, you will have to nest condition blocks
      • But in this example I have used the advanced mode and combined the two conditions into one condition block
      • You can use “@and()” or “@or()” to group your conditions

    5

  5. Next step is to create the connection to the Computer Vision API
      • For this you will need a cognitive service setup in Azure and the service URL with a key to use it
      • Add an action of type “Computer Vision API – Describe Image” in the TRUE/YES branch of the above condition

    6

      • Set the “Image Source” as Image Content
      • Set the Image content as Document body. But you will have to convert from Base64 to Binary before you pass it to the action. You can navigate to the expressions area and set this. (base64ToBinary(triggerBody()?[‘documentbody’]) )

    7

  6. Now to get the results of the analysis and capture it. I’m using the captions describing the image for the example.
      • Add a new action of type “Variables – Appends to string variable”
      • Select the variable initialized at the start of the flow
      • Append “Caption Text” and “Caption Confidence Score” to your variable
      • Since there can be multiple captions generated flow will automatically add a recursive block around your action.
      • Caption will describe the image and the caption confidence score will give you a score between 0 and 1 (where 1 being the best possible score).

    8

  7. Computer vision also analyses the image and provides tags that best suites the image. To capture this information I have added another action and append the values to the same variable as above.9
  8. Similarly we can use the Optical Character Recognition capabilities of the Computer Vision API to extract the text in the image.
      • In this example I have added another action to connect to the “Computer Vision API” of type “Optical Character Recognition (OCR) to Text”

    10

      • Similar to the previous action we will set the image source as the image content and set the image content to the document body (base64ToBinary(triggerBody()?[‘documentbody’]))
      • Then append the detected text to the variable

    11

  9. Final step is to update the note with the results.
      • Add an action to update a Dynamics 365 record
      • Select the CRM organization from your connections and the entity we are updating
      • Use the identifier of the note we are editing as the “Record Identifier”
      • Set the variable containing the results to the description field and append the existing description to the end. This way we don’t overwrite existing information that are already there in the description field.

    12

    • This step will update the Dynamics 365 record with the results of our analysis. This can be used for various purposes.

Lets look at some of the results:

OCR example
OCR example

Image description example

For more information and live demos please visit: Microsoft Computer Vision API

Here are two Flow demos I’ve prepared that uses Computer Vision API:

Twitter Social Insights

D365 Image Attachment Analysis

The Journey Begins

Hi, I’m Thanura Wijesiriwardena. I know my name is really hard to pronounce but you can always call me “T” or “Thunder” like my mates do at work and cricket.

Childhood:

Looking at my long last name most of you would have guessed it right. Yes, I was born and raised in Sri Lanka. I grew up in a suburb called “Attidiya”, about 15kms south of Colombo and next to Mount Lavinia which is famous for its beaches and the iconic Mount Lavinia Hotel.

First Steps:

I still remember the day, it was in 1995. I returned home after school to find my dad setting up a computer. It was an IBM 386 with a 40MHz processor, running windows 3.1 and had both 5.25 inch and 3.5 inch floppy drives. It was my first PC which I mainly used to play games.

It wasn’t until 1998 that I got a taste of the new and evolved Windows platform in “Windows 95” when we upgraded our pc to a Pentium 1.

Building Blocks:

I received my primary education at Thurstan College (Colombo) and then moved to D.S. Senanayake College (Colombo) for secondary education. This is where my passion for programming started.

My brother and I decided to enter a competition organised by a television broadcasting company. We built a simple html website using FrontPage Express. I was 11 and my brother was 14 then. We expressed ourselves in bold and bright colours and somehow got a mention during the results telecast.

I started programming when I was 13 (Inspired by my brother). I used VB 6 to build my first windows application. It was a contact management application linked to an Access DB. It had the ability to validate a person’s gender and date of birth based on their Sri Lankan National ID number.

I was introduced to Macromedia Flash and Dreamweaver the next year. My application programming went on the backburner as I spent more and more time on flash animations. Then I moved on to do some 3D animations using 3D Studio Max for a while.

I was just a young boy embarking on the world of technology trying to find my place.

En-route to the land down under:

Most of my younger years were spent playing cricket. But with studies being the priority for me, I decided to pause my cricket career and decided to focus more on Information Technology. After completing my school education, I joined Sri Lanka Institute of Information Technology in 2008. Two years of studying and a higher diploma later, I decided to move to Melbourne for further education.

I completed my Bachelor of Science (IT) at Swinburne University of Technology in 2010 and went on to complete Master of IT (Software Engineering) in 2011.

During these years I interned at Swinburne University of Technology and was also involved in various projects building websites, windows applications and integration pieces using different technologies such as .NET, Java and php.

Path to Business Application Platforms:

After my tenure at Swinburne I started working as a software developer for an IT solutions provider in Port Melbourne. Initially I was working on Sage SalesLogix CRM customisations and integrations. I started getting involved in Microsoft CRM projects (from CRM v4 onwards) and got liking to it soon after.

I learned the basics of business applications and CRM systems while working at Customer Systems International for 2 years.

I joined Hammond Street Developments (HSD) in January 2014. I’m privileged to work with some of the best in the business. The projects have been diverse and the experience gained has allowed me to grow as a person.

Stepping into the world of a Dynamics 365 consultant:

I’ve been working as a Dynamics 365 Technical Lead/Consultant for the past few years. My current technology focus includes Dynamics 365 Business Applications Platform and Azure serverless computing. I will be sharing my experiences and I hope you will follow me on my journey as the technology evolves.

Thanks for joining me!

— Thanura Wijesiriwardena